

How to Install a Whole House Iron Filter (Step-by-Step)
Iron Filter Guides
This guide focuses on iron filters specifically. If you're installing multiple systems (sediment filter, acid neutralizer, softener, UV, etc.), see our complete well water filtration system installation guide which covers every system type in one place.
How to Install a Whole House Iron Filter (Step-by-Step)
A complete DIY installation guide for the Fleck 2510AIO iron filter with Katalox Light media. Covers placement, plumbing, media loading, programming, and putting the system into service.
By Aidan Walsh, Water Treatment Specialist • 32 years of field experience • Updated March 2026
Want the full picture? Start with our Complete Iron Filter Guide.
TL;DR: Iron Filter Installation Overview
- Difficulty: Moderate DIY project. If you can connect a washing machine or replace a water heater, you can install this system. No soldering required.
- Time: 2 to 4 hours for a typical installation. Add 1 hour if you need to run a new drain line.
- Placement: After the pressure tank and acid neutralizer (if you have one), but before the water softener. The iron filter is the second or third unit in a whole-house treatment sequence.
- Connections: 1-inch female threaded inlet and outlet on a stainless steel bypass valve. The Fleck 2510AIO comes with the bypass pre-installed.
- Drain line: Required for backwash. Run 1/2-inch tubing to a floor drain, laundry tub, or standpipe. Can run 30 to 40 feet if needed.
- Electrical: Standard 110V outlet within 6 feet of the unit. The control valve draws minimal power (less than a nightlight).
- Programming: The Fleck 2510AIO valve comes pre-programmed from Mid Atlantic Water. You only need to set the current time of day. Do not change other settings.
- The system: Fleck 2510AIO 1.5 cu ft ($2,095) for 1 to 3 bathrooms, or 2.5 cu ft ($2,495) for 3 to 5+ bathrooms. Both include the tank, valve, media, and bypass.
- Need help choosing the right size? Call Aidan at 800-460-5810 with your water test results and he'll tell you exactly which system fits your home.
Before You Start: What You Need to Know
The Fleck 2510AIO iron filter uses a process called air injection oxidation (AIO) to remove dissolved iron, sulfur, and manganese from well water. During each backwash cycle, the valve draws a pocket of air into the top of the tank. This air oxidizes dissolved iron (converts it from invisible ferrous iron to visible ferric iron particles). The Katalox Light media then traps and filters out those particles. The automatic backwash flushes the trapped sediment to drain every few days.
No chemicals. No cartridges to replace. The Katalox Light media lasts 7 to 10+ years under normal conditions. If you want to understand the full process, read How Iron Filters Work in our complete guide.
System Sizes and Pricing
| Model | Tank Size | Best For | Price |
|---|---|---|---|
| Fleck 2510AIO 1.5 cu ft | 10" x 54" | 1 to 3 bathrooms | $2,095 |
| Fleck 2510AIO 2.0 cu ft | 12" x 52" | 2 to 4 bathrooms | $2,295 |
| Fleck 2510AIO 2.5 cu ft | 13" x 54" | 3 to 5+ bathrooms | $2,495 |
Not sure which size? Call Aidan at 800-460-5810 with your water test results. He'll size it based on your iron levels, flow rate, and household size. See our buyer's guide for detailed sizing help.
Where the Iron Filter Goes in Your Treatment Sequence
Placement order matters. Installing equipment in the wrong sequence is one of the most common mistakes, and it can reduce performance or damage downstream systems. Here is the correct order from your well to the house:
(optional)
(if pH < 7.0)
(YOU ARE HERE)
(if hard water)
(optional)
Why Order Matters
- Iron filter before the softener: Iron will foul softener resin and destroy it within months. The iron filter removes iron first, so the softener only has to deal with hardness. Learn more about iron and manganese treatment.
- Acid neutralizer before the iron filter: The Katalox Light media in the AIO system works best at pH 7.0 or above. If your water is acidic (pH below 7.0), install an acid neutralizer upstream to raise the pH first. This makes the iron filter significantly more effective.
- After the pressure tank: The system needs consistent water pressure to function. Never install it between the well pump and the pressure tank.
Not sure if you need other systems? Test your water for pH, hardness, iron, manganese, and sulfur. Send the results to Aidan and he'll tell you exactly what sequence you need.
What Comes in the Box
Every Fleck 2510AIO iron filter from Mid Atlantic Water ships as a complete system. Here's what you'll find on the pallet:
Pre-assembled with internal riser tube and lower distributor
Pre-programmed control valve with built-in Venturi air injector
1" female thread inlet and outlet with directional arrows
Ships in separate bags. You pour it into the tank during setup.
Vortech distributor plate built into the tank bottom (no gravel needed)
For pouring media into the tank opening
Important: Katalox Light Is NOT Pre-Loaded
The media ships in separate bags inside the box. You will load the Katalox Light into the tank yourself before installing the valve head. This takes about 15 to 20 minutes. The Vortech tank has a built-in distributor plate at the bottom, so there is no gravel to deal with. See Step 3 below for the exact process.
Tools and Materials You'll Need
Included With the System
- Mineral tank with riser tube
- Fleck 2510AIO valve head
- Stainless steel bypass valve
- Katalox Light media bags
- Vortech mineral tank (distributor plate built in)
- Media loading funnel
- Drain line adapter fitting
You'll Need to Provide
- Two 1" male thread adapters (to match your pipe type: PEX, CPVC, copper, etc.)
- 1/2" drain tubing (enough to reach your drain)
- Teflon tape (PTFE thread seal tape)
- Channel-lock pliers or adjustable wrench
- Pipe cutter (if cutting into existing plumbing)
- Bucket and towels (for residual water)
- Electrical tape or painter's tape (to cover center tube)
- 110V electrical outlet within 6 feet
PEX users: You'll need 1" PEX crimp or push-fit fittings with male NPT thread on one end. SharkBite push-fit adapters work well and require no special tools. One-inch PEX is the right size for whole-house plumbing after the pressure tank.
Copper users: You'll need 1" copper to male NPT thread adapters. If you're comfortable soldering, solder the adapters in place. Otherwise, use push-fit (SharkBite) transition fittings to avoid soldering entirely.
Step-by-Step Installation (10 Steps)
Choose Your Location
The iron filter should be installed indoors in a dry, temperature-controlled area (34°F to 120°F). Basements, utility rooms, and well houses are typical. The system needs:
- Floor space: The tank is about 10 to 13 inches in diameter depending on size. Allow at least 24 inches of clearance above the tank to remove the valve head for future service.
- Proximity to the main water line: After the pressure tank (and acid neutralizer, if you have one), before the water softener.
- Access to a drain: Floor drain, laundry tub, standpipe, or washing machine drain are all acceptable. The drain line can run up to 30 to 40 feet if needed.
- 110V electrical outlet: Within 6 feet of the valve head. The transformer plugs into a standard outlet. No dedicated circuit required.
- Level surface: The tank must sit flat and level. Uneven floors can stress the plumbing connections over time.
Shut Off Water and Relieve Pressure
Turn off the well pump at the breaker or pressure switch. Open a faucet downstream to relieve pressure in the system. If you have an existing system with a bypass valve, put it in bypass mode before disconnecting anything.
Place a bucket and towels under the area where you'll be cutting into the plumbing. Even after draining, there will be residual water in the pipes.
Load the Media Into the Tank
This step is done before the valve head goes on. The tank arrives empty with the Vortech distributor plate already built into the bottom. No gravel needed. Here's the process:
- Cover the center riser tube. Use electrical tape or painter's tape to completely cover the top opening of the center tube sticking up from inside the tank. This prevents media from falling into the tube and clogging the lower distributor. This is critical.
- Use the included funnel. Place the funnel in the tank opening. Pour the Katalox Light media bags into the funnel, one at a time. Work slowly to avoid overfilling the funnel.
- Remove the tape from the center tube after all media is loaded. Make sure no tape residue falls into the tube.
Do Not Skip the Tape Step
If Katalox Light media enters the center riser tube, it will end up in your plumbing and clog fixtures. Cover the tube opening completely before pouring any media. Remove the tape only after all media is loaded.
Install the Valve Head
The Fleck 2510AIO valve head threads onto the top of the mineral tank.
- Apply a thin layer of silicone lubricant (not Teflon tape) to the large O-ring on the bottom of the valve head. This ensures a watertight seal and makes future removal easier.
- Carefully align the valve head with the center riser tube. The riser tube must slide into the center port of the valve body.
- Thread the valve head onto the tank by hand. Tighten firmly, but do not over-torque. Hand-tight plus a quarter turn with a wrench is sufficient.
The valve head should sit squarely on the tank. If it's crooked, the riser tube may not be seated properly. Remove and re-align.
Attach the Bypass Valve
The stainless steel bypass valve connects to the back of the Fleck 2510AIO valve head. It has two ports with directional arrows showing inlet and outlet.
- Identify the inlet and outlet arrows on the bypass valve. The inlet arrow points toward the valve head; the outlet arrow points away. Follow the arrows printed on the bypass itself.
- Push the bypass valve firmly onto the valve head ports until it clicks or seats fully. The connection uses O-ring seals.
- Verify the bypass handles are in the bypass position (arrows pointing toward each other). You will open to service position in Step 10, after everything is connected and tested.
The bypass valve connections are 1-inch female NPT thread on both sides. This is where your plumbing connects.
Connect the Plumbing (Inlet and Outlet)
The bypass valve has two 1-inch female threaded connections. You'll need 1-inch male NPT adapters to transition to your pipe type.
- Wrap Teflon tape (4 to 5 wraps, clockwise) on the male threads of your adapters.
- Connect the inlet (from the pressure tank / acid neutralizer) to the bypass port marked with the inlet arrow.
- Connect the outlet (going toward the house / water softener) to the bypass port marked with the outlet arrow.
- Tighten with channel-lock pliers. Snug plus a quarter turn. Do not over-tighten, as this can crack fittings.
Pipe type notes:
- PEX: Use 1" PEX to 1" male NPT crimp or push-fit adapters. One-inch PEX is the standard for main lines.
- CPVC: Use 1" CPVC to 1" male NPT solvent-weld adapters.
- Copper: Use 1" copper to 1" male NPT sweat adapters, or SharkBite push-fit transitions to avoid soldering.
Run the Drain Line
The Fleck 2510AIO backwashes every few days, flushing iron sediment and dirty water to a drain. You need to run a drain line from the valve head to an appropriate drain point.
- Connect 1/2-inch tubing to the drain port on the valve head. The system includes a drain adapter fitting.
- Route the tubing to your drain: floor drain, laundry tub, standpipe, or an existing washing machine drain connection all work.
- Keep the line as short and straight as practical. If you need to run it longer, that's fine. Aidan has run drain lines 30 to 40 feet across basements during his years doing installations.
- Leave an air gap at the drain end. Do not submerge the drain line in standing water. The tubing should hang above the drain opening, not dip into it. This prevents backflow contamination.
Drain Line Requirements
The drain must handle the backwash flow rate (approximately 2 to 4 gallons per minute for the 2510AIO). A standard floor drain or laundry tub can easily handle this. If you're running the line to a sump pit, make sure the sump pump can keep up during a backwash cycle (about 60 to 90 minutes, but the water flows intermittently, not continuously).
Plug In the Power
Plug the Fleck 2510AIO transformer into a standard 110V outlet. The display will light up. The valve draws minimal power (comparable to a digital clock), so no dedicated circuit is needed.
If there's no outlet nearby, have an electrician add one. Do not use an extension cord for a permanent installation. The transformer needs a reliable, continuous power connection to maintain the programmed schedule.
Set the Time of Day
The Fleck 2510AIO control valve comes pre-programmed from Mid Atlantic Water. You only need to set one thing: the current time of day.
- The display will show the time of day. Use the up/down arrows to set the correct current time.
- Do not change any other settings. The backwash frequency, cycle times, and air draw settings are already programmed for your specific media type and tank size.
That's All the Programming
Seriously. The valve is set to backwash every 3 days at 2:00 AM by default (when water usage is lowest). The backwash uses approximately 100 gallons and takes 60 to 90 minutes. You'll never notice it running. If you need to change the backwash time for any reason, call Aidan at 800-460-5810 and he'll walk you through it.
Put the System Into Service
Now it's time to bring everything online. Take this slowly to avoid water hammer and to flush the system properly.
- Check all connections. Visually inspect every fitting, the valve head, and the drain line.
- Turn the well pump back on at the breaker. Let the pressure tank fill.
- Slowly open the bypass valve to the service position. On the stainless steel bypass, turn the handles so the arrows point away from each other (opposite of the bypass position). Open slowly over 15 to 20 seconds to let water gradually fill the tank.
- Check for leaks. Inspect the valve head connection, bypass fittings, plumbing adapters, and drain line. Tighten anything that drips. A small seep at a threaded connection usually just needs another quarter turn.
- Initiate a manual backwash cycle. Press and hold the regeneration button on the Fleck 2510AIO valve to start a manual backwash. This flushes any loose media fines and air from the system. Watch the drain line for water flow to confirm the drain is working properly.
- Run water at a faucet inside the house. You may see some discoloration or fine sediment for the first few minutes. This is normal. Run the water until it clears completely.
You're Done
Your iron filter is now installed and operational. The system will backwash automatically on schedule. You should notice clearer water within the first day. Orange staining on fixtures will gradually stop as the iron is removed before it reaches your plumbing. For more on what to expect, see our iron removal methods guide.
Common Installation Mistakes
After 32 years in water treatment and thousands of installations, these are the mistakes Aidan sees most often. Every one of them is avoidable.
| Mistake | What Happens | How to Avoid It |
|---|---|---|
| Not covering the center riser tube before loading media | Katalox Light media falls into the tube, travels through plumbing, and clogs faucet aerators and fixtures | Cover the tube completely with tape before pouring any media. Remove tape after loading. |
| Installing the iron filter after the water softener | Iron fouls the softener resin. Performance degrades within weeks. Resin replacement costs $300 to $500. | Iron filter always goes before the softener. See the treatment sequence above. |
| Reversing inlet and outlet connections | Water flows through the media bed in the wrong direction. Reduced filtration, media displacement, and potential clogging. | Follow the directional arrows on the bypass valve. Double-check before turning water on. |
| No air gap on the drain line | Potential for backflow contamination if the drain backs up during a backwash cycle. | Leave the drain tubing hanging above the drain opening. Never submerge the end in standing water. |
| Changing the pre-programmed valve settings | Incorrect backwash times, insufficient air draw, or too-frequent/infrequent regeneration cycles. | Only set the time of day. Leave everything else as shipped. Call Aidan at 800-460-5810 if you think a setting needs adjusting. |
| Skipping the initial backwash | Fine media dust ends up in your house plumbing, creating temporary black or dark-colored water at fixtures. | Always run a manual backwash before putting the system into service. |
| Using an extension cord for power | Loose connections or power interruptions can reset the valve's programming and disrupt the backwash schedule. | Plug directly into a wall outlet. If there isn't one nearby, have an electrician install one. |
Real Customer Installations
These are verified buyers who purchased from Mid Atlantic Water and installed the system themselves. Their photos and reviews are published with permission on our product pages.
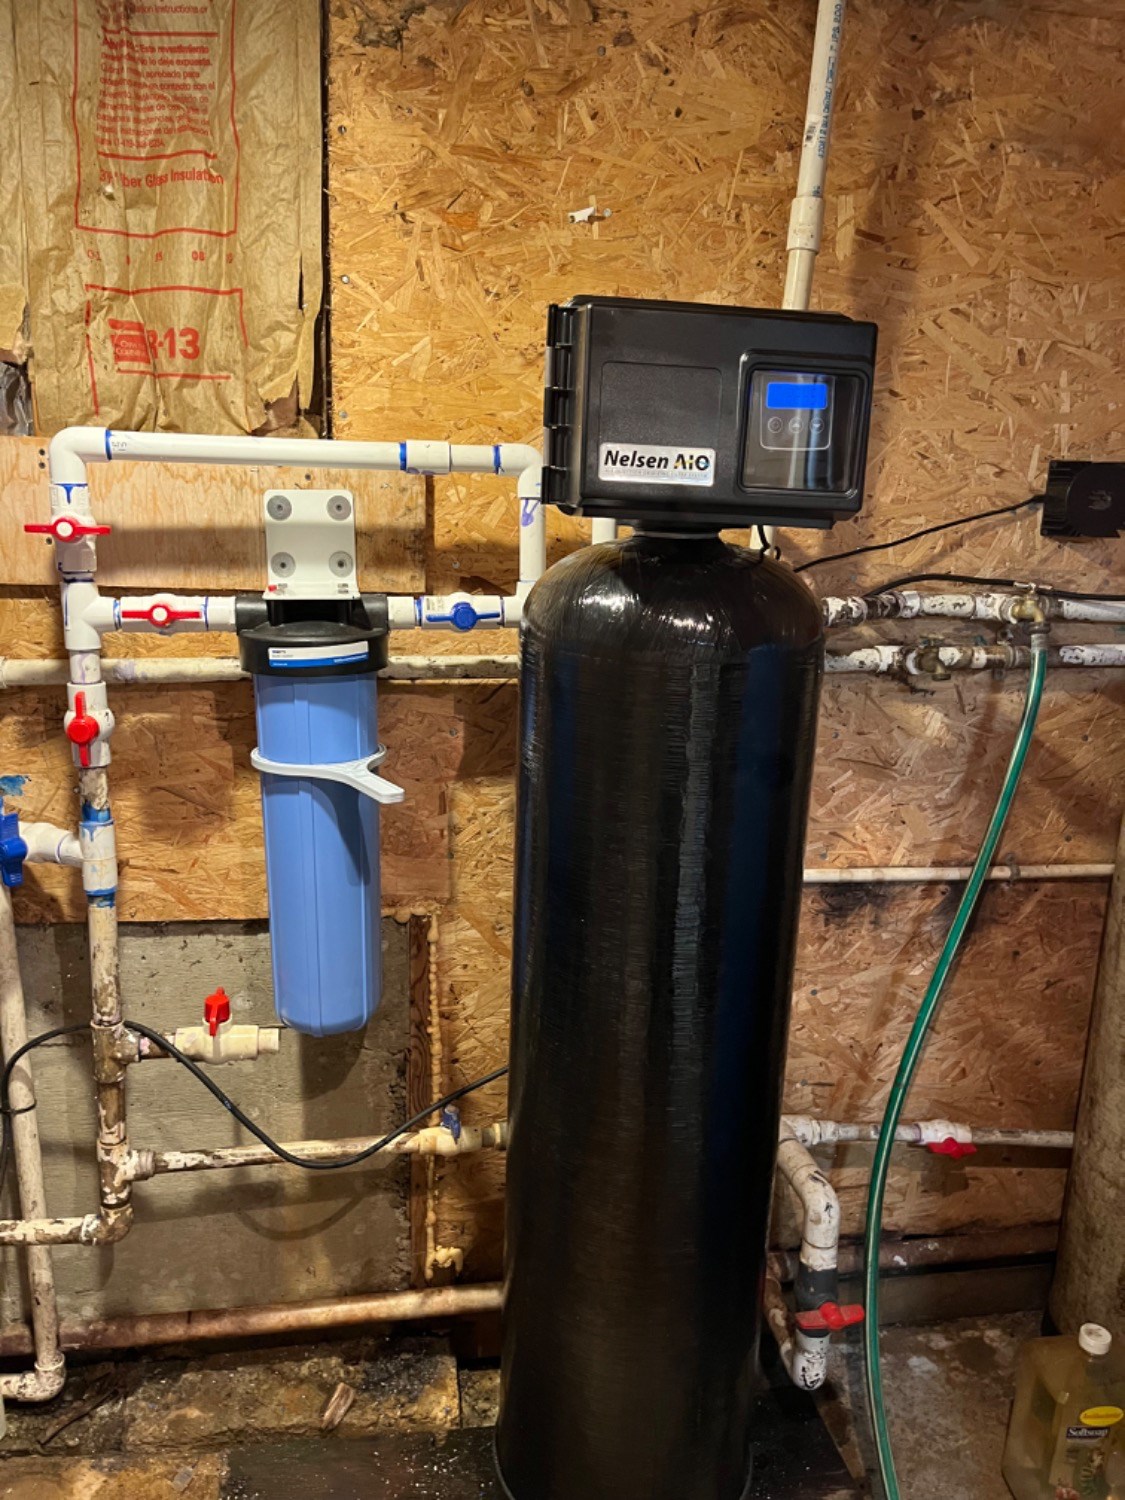
"Straight forward installation. In, out, and the drain. Ran a back wash cycle then put it online and it works GREAT! I am on a well with mildly acidic water around 6.5 with ferrous iron in it so this was the perfect solution for me. Cleaned out the iron and raised the ph to 7.5. Culligan tried to sell me a $5,000+ system."
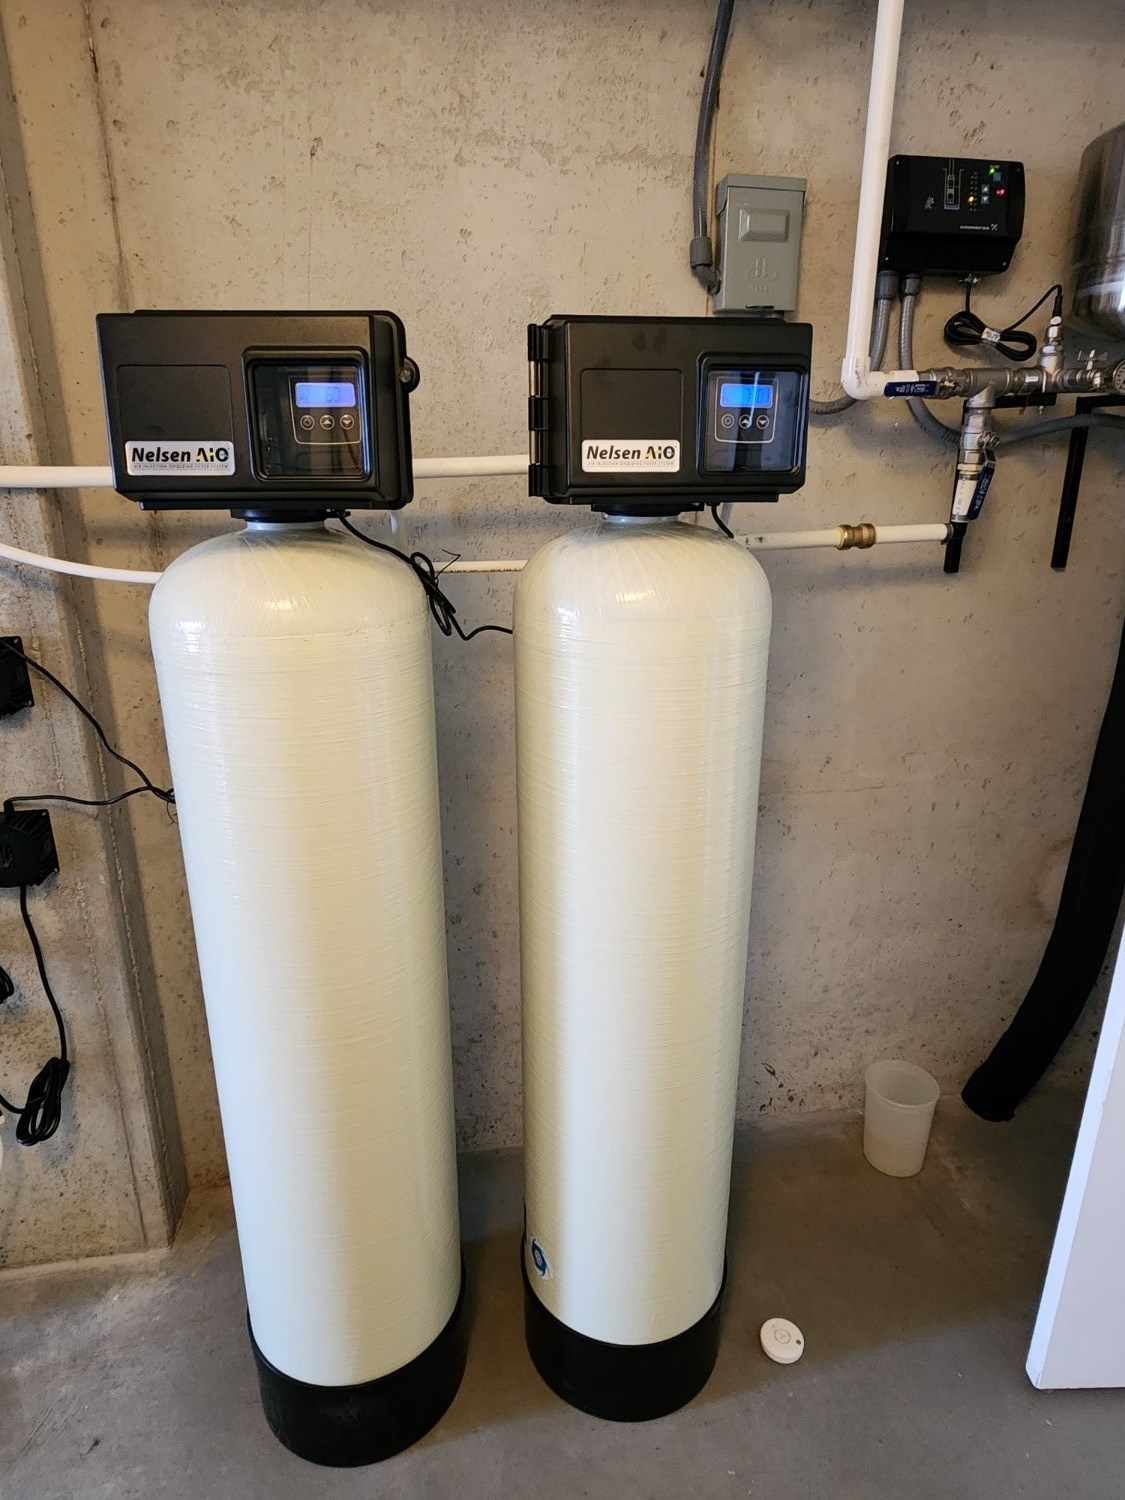
"I have well water with over 20 ppm ferrous and 7 ppm of ferric iron, along with manganese and some sulfur. I was rejected by local water companies saying they could not help me with my high iron issues. I purchased two Fleck 2.5 cu. ft. 2510AIO Iron Filter tanks with Katalox Light media and air injection."
Want to see more? Check the product page reviews for the 2.5 cu ft system, or the 1.5 cu ft system.
When to Call a Plumber
Most homeowners can install this system themselves. But there are situations where hiring a plumber is the smarter move:
- All-copper plumbing with no existing unions or shutoffs: If you need to solder new fittings into a copper line, and you don't have soldering experience, a plumber will save you time and potential water damage.
- No existing drain access: If you need to tap into a PVC drain stack or install a new floor drain, that's plumbing work beyond the scope of the filter installation itself.
- Tight or awkward spaces: If the system is going in a crawl space, very small utility closet, or an area with limited access, the physical difficulty goes up significantly.
- Multiple systems at once: If you're installing an acid neutralizer, iron filter, and water softener in the same session, the plumbing complexity increases. Having a plumber handle all three connections in one visit is efficient.
- You're just not comfortable with it: No judgment. Buying the system directly from Mid Atlantic Water at $2,095 to $2,495 and paying a plumber $200 to $400 for installation still puts you well under the $4,000 to $8,000 that full-service water treatment companies charge for the same system installed.
If your plumber has questions during installation, tell them to call Aidan at 800-460-5810. He's walked hundreds of plumbers through this process.
Frequently Asked Questions
Do you install iron filter or softener first?
Iron filter first, then the water softener. Iron will foul softener resin and destroy it within months if untreated water reaches the softener. The iron filter removes the iron, so the softener only has to deal with hardness minerals. If you also have acidic water (pH below 7.0), the sequence is: acid neutralizer, then iron filter, then softener.
How much does it cost to install an iron filter?
The system itself costs $2,095 to $2,495 depending on size. If you install it yourself, the only additional cost is plumbing fittings and drain tubing ($20 to $50). If you hire a plumber, expect $200 to $400 for the labor. Total cost: $1,815 to $2,595, compared to $4,000 to $8,000+ from full-service water treatment companies. Read our detailed iron filter cost breakdown for the full picture.
How long does installation take?
2 to 4 hours for a typical DIY installation. This includes loading media, connecting plumbing, running the drain line, and doing the initial backwash. A plumber will usually finish in 1 to 2 hours since they're not loading media (you can do that beforehand).
Can I install this outdoors?
Only if the area is protected from freezing temperatures and direct weather. A well house with some insulation works. An open-air setup does not. If water freezes inside the tank, it can crack the vessel and destroy the valve. Temperature range: 34°F to 120°F.
What if I don't have a drain nearby?
You can run the drain line up to 30 to 40 feet using 1/2-inch tubing. Route it along walls, through floor joists, or across the basement ceiling to reach a laundry tub, floor drain, standpipe, or washing machine drain. During his years of installations, Aidan has run drain lines across entire basements. It's not unusual. Just maintain a slight downhill pitch toward the drain.
Do I need a sediment pre-filter?
It's recommended but not required. A 5-micron sediment pre-filter before the iron filter protects the Katalox Light media from sand, silt, and other particulate. This is especially useful if you have a sandy well. A basic spin-down or cartridge pre-filter costs $30 to $80 and takes 10 minutes to install.
What size PEX should I use?
One-inch PEX for the main lines connecting to the iron filter. The bypass valve connections are 1-inch female thread. Reducing to 3/4-inch PEX at the filter connections will restrict flow and reduce system performance. Keep the main line at 1 inch from the pressure tank through all treatment equipment.
What are common problems with iron filters?
The most common issues are installation-related, not equipment-related: reversed inlet/outlet connections, media in the riser tube (from not taping it during loading), and inadequate drain lines. Once properly installed, the Fleck 2510AIO with Katalox Light is extremely reliable. The media lasts 7 to 10+ years and the Fleck valve is the industry standard. If you do run into an issue, call Aidan at 800-460-5810.
How often does the system backwash?
Every 3 days at 2:00 AM by default. The backwash uses approximately 100 gallons and takes 60 to 90 minutes. You won't notice it running. The schedule is pre-programmed. Do not change it unless Aidan advises otherwise based on your specific water chemistry.
Can I install this myself or do I need a plumber?
Most homeowners with basic plumbing skills install it themselves. The system has three connections: inlet, outlet, and drain. No soldering is required if you use push-fit (SharkBite) fittings. If you're unsure, take the assessment above or call Aidan at 800-460-5810 and he'll tell you honestly whether you can handle it based on your setup.